The Physics Of Snowboarding
An understanding of the physics of snowboarding is useful to snowboarders of all skill levels because it allows them to identify those key physics principles enabling them to properly execute certain moves, which is useful from a performance point of view.
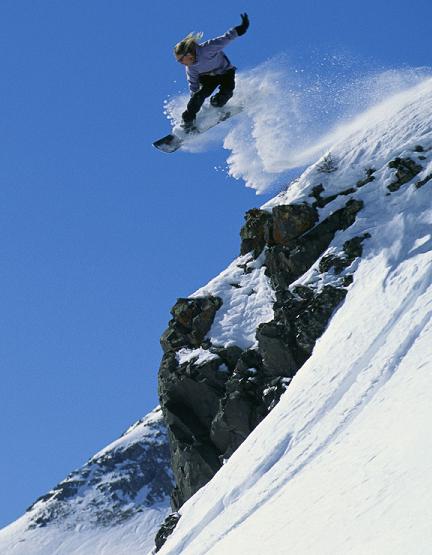
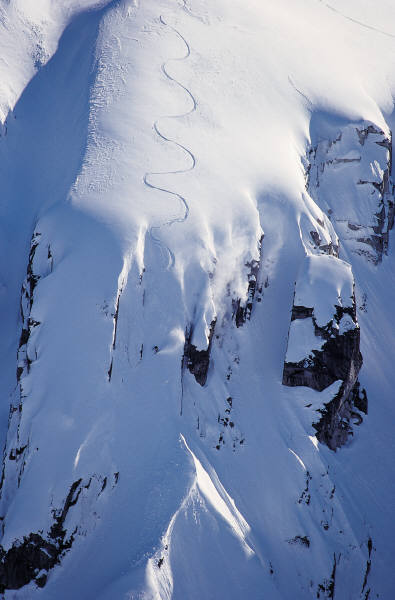
A snowboarder typically gains speed by converting gravitational potential energy into kinetic energy of motion. So the more a snowboarder descends down a hill, the faster he goes. The two pictures above show a snowboarder going down a mountain. However, since the side of the mountain is very steep, the snowboarder must prevent himself from going too fast and losing control. He does this by skidding his board on the snow, in a controlled zig-zag pattern (shown in the first picture). This creates frictional resistance with the snow and prevents his speed from reaching dangerously high levels.
A common snowboarder stunt is to jump off a helicopter and land on the side of a mountain, before racing down. The landing force experienced by the snowboarder is reduced because his normal velocity component relative to the mountain surface, just before landing, is small. This is a result of the side of the mountain being at an inclination (i.e. not flat).
In the following section skidding will be discussed.
Physics Of Snowboarding – Skidding
Amateur (less experienced) snowboarders typically skid around their turns. This occurs when the snowboard is tilted on its edge and the exposed base of the board "plows" into the snow head on. Although the skidding can be controlled and the turn successfully executed, it ultimately results in a significant loss in speed, which can be undesirable. This occurs because the "plowing" action generates frictional resistance with the snow, by physically pushing it. This frictional resistance is significantly more than the resistance seen if the snowboard were to glide on the snow, either with the base of the snowboard flat on the snow (while moving in a straight line in the direction of the snowboard), or with the edge of the snowboard planted into the snow (while carving around a turn, to be discussed). In both these cases, the snowboard is pointed in the same direction as its velocity (which is the same as the velocity of the snowboarder). This is a necessary requirement for minimizing snow resistance, and maximizing speed.
The figure below illustrates a turn that is executed while skidding.
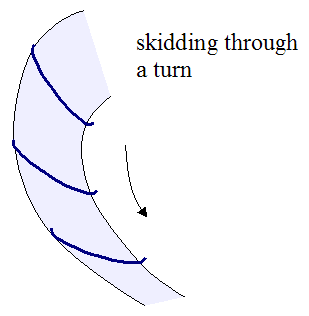
The path "swept" by the snowboard is the result of plowing the base of the snowboard through the snow. This happens when the snowboarder turns his snowboard too sharply into the turn. This results in the momentum of the snowboarder not changing direction quickly enough to match the direction the snowboard is pointed.
However, in some cases, a degree of skidding is unavoidable, but the key is to minimize it in order to minimize the speed reduction during the turn.
The most efficient turn occurs when the snowboarder does a purely carved turn, in which the snowboard is pointing in the same direction as its velocity. The figure below illustrates this.

As shown in the figure above, in a purely carved turn there is no skidding, and the only snow resistance present is the very small sliding friction between snowboard and snow. As a result of this minimal level of friction between snowboard and snow, the speed reduction of the snowboarder is minimized, and he is able to navigate the course faster. Carving turns is one of the more interesting areas of study in the physics of snowboarding.
It takes quite a bit of skill to execute a carved turn. Top level snowboarders are typically the only ones who are able to do it consistently. The picture below shows a snowboarder executing a purely carved turn.
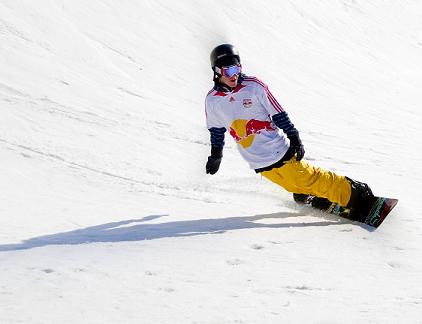
Source: http://www.flickr.com/photos/tonythemisfit/3270147185
The physics of carved turns will be described next.
Carved Turns
The physics behind carving is different from the physics behind skidding. Unlike skidding where a snowboarder pivots into a turn, a carved turn is initiated by the snowboarder easing into the turn.
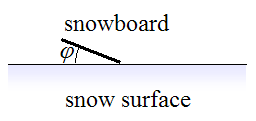
Snowboards are manufactured with a sidecut on both sides. The amount of sidecut determines the curvature of the snowboard, which is of a certain constant radius along the sidecut edge. The figure below illustrates a sidecut snowboard, where RSC is the sidecut radius.

Source: http://www.flickr.com/photos/robbie1/2067112
The sidecut helps snowboarders make purely carved turns. It affects the physics by influencing the radius of purely carved turns, as will be discussed.
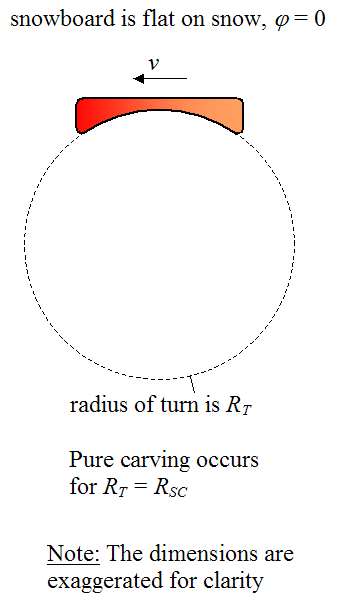
A purely carved turn can be done with a snowboard that is flat on the snow or tilted at an angle to the snow. The figure below illustrates a snowboard that is tilted at an angle φ to the snow. When the snowboard is flat on the snow φ = 0.
(Note: In reality the snowboard edge is pressed into the snow, for a given angle φ. This is discussed in more detail in the section on how to prevent snowboard slippage).
When the snowboard is flat on the snow, a purely carved turn is executed when the radius of the turn RT equals the sidecut radius RSC. This allows the snowboard to go around the turn without any skidding, since the snowboard is always pointed in the same direction as its velocity v. The figure below illustrates a purely carved turn for a snowboard that is flat on the snow.
When the snowboard is not flat on the snow, and φ does not equal zero, a purely carved turn can be executed by using the right amount of reverse camber on the snowboard. Reverse camber occurs when the force of the snowboarder's feet on the snowboard causes the snowboard to bend in a shallow "U" shape, as shown below.
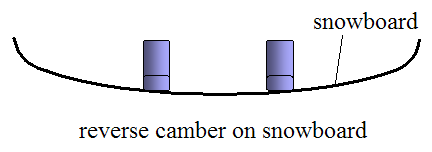
Snowboards can be manufactured with a camber which is opposite to that shown in the figure above. In other words, the ends of the snowboard touch the ground while the middle of the snowboard is elevated. This is done to control how much the snowboard flattens out when the weight of the snowboarder is applied to the board. A flat snowboard distributes the weight of the snowboarder more evenly over the snow surface, which means the snowboard doesn't dig into the snow as much, and snow resistance is reduced. This is useful when snowboarding with no tilt on the board. Alternatively, if the snowboard is manufactured flat, then the middle of the snowboard would sink more than the ends when the snowboarder's weight is applied, and movement through the snow would be more difficult. However, the amount that the middle of the snowboard bends when a given weight is applied depends on the stiffness of the snowboard, which can vary in different snowboards.
There are times when reverse camber is desirable, such as when carving a turn, where the snowboard is tilted at a certain angle φ to the snow (which will be explained next). This allows the snowboard to match the radius of the turn. This tells us that snowboards must largely be selected based on the snowboarder's weight, and how much reverse camber is desired, which depends on the type of snowboarding to be done.
To understand why a reverse camber is necessary when making a purely carved turn at some tilt angle φ, let's first look at the case where the snowboard is tilted, but with no reverse camber. The figure below illustrates this.
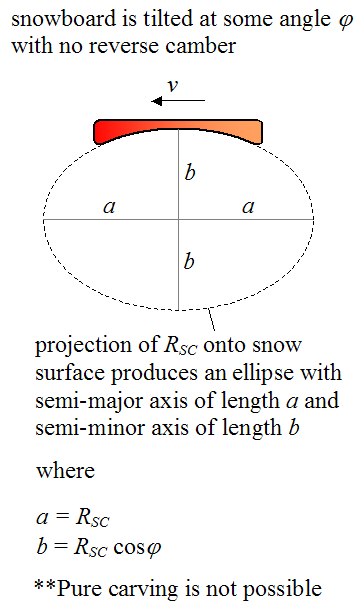
The projection of the sidecut radius RSC onto the snow surface must be a circle in order for the inside edge of the (tilted) snowboard to make a purely carved turn. But since the projection of the sidecut radius onto the snow surface is an ellipse, a purely carved turn is not possible. In other words, the inside edge of the snowboard would not be able to follow the curve defined by the ellipse. There would be some skidding as a result of the snowboard pointing in a direction different from the direction of its velocity v.
Therefore, the snowboard needs to have a reverse camber such that the sidecut radius, when projected onto the snow surface, is a circle. The reverse camber must be great enough to shorten the length of the semi-major axis so that it equals the length of the semi-minor axis, which gives us a circle (or very close to it). This allows the inside edge of the snowboard to make a purely carved turn. The figure below illustrates this.
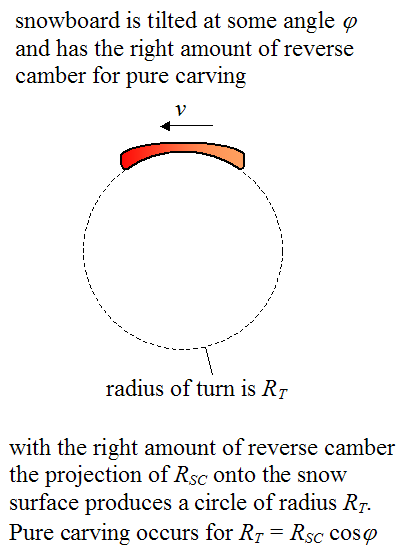
The right amount of reverse camber reduces the length of the semi-major axis (in the previous figure) so that its length equals the length of the semi-minor axis (length b = RSC cosφ). As a result, the projection of RSC onto the snow surface produces a circle of radius RSC cosφ. This is the radius of the turn for pure carving to occur. This equation tells us that the greater the tilt angle φ, for a given RSC, the smaller the corresponding carving radius RT, and the greater the reverse camber necessary to achieve it.
In the next section we will take a closer look at carving and how it relates to sidecut edge penetration into the snow.
Closer Look At Carving And Sidecut Edge Penetration
For a given tilt angle φ and sidecut radius RSC, the maximum amount of reverse camber occurs when the sidecut edge presses into the snow. To understand this consider the following. When a straight snowboard (with no camber) is edged into the snow at an angle φ, only the tip and tail part of the snowboard are touching the snow, and there is a gap in the middle of the snowboard between the sidecut edge and the snow surface. This gap is greater for a smaller sidecut radius, and this gap is smaller for a larger sidecut radius. The maximum amount of reverse camber occurs when this gap is closed – in other words, when the sidecut edge presses into the snow. So the larger the gap, the more reverse camber is possible, since the snowboard can bend more in the middle before the sidecut edge presses into the snow.
A snowboard with a smaller sidecut radius (and larger gap between sidecut edge and snow surface), can accommodate a greater amount of reverse camber, which means it can carve smaller radius turns. A snowboard with a larger sidecut radius (and smaller gap between sidecut edge and snow surface), can accommodate a lesser amount of reverse camber, which means it is best suited for carving larger radius turns.
Therefore in summary, snowboards with a larger sidecut radius RSC are best suited for carved turns with a small tilt angle φ (since they can only accommodate a lesser degree of reverse camber). And snowboards with a smaller sidecut radius RSC work well for larger tilt angles φ (since they can accommodate a greater degree of reverse camber). This tells us that carved turns of small radius RT are best executed with snowboards that have a smaller RSC, since the corresponding tilt angle φ can be high. But carved turns of large radius RT are best executed with snowboards that have a larger RSC, since the corresponding tilt angle φ can only be low.
Given the complexity of all these inter-related factors, the ability of a snowboarder to make a purely carved turn comes down to his ability to recognize the terrain and make adjustments, based on the factors just mentioned. Clearly, carving adds substantial complexity to the physics of snowboarding.
In the next section we will look at the forces acting on a snowboarder that is going around a purely carved turn.
Force Balance For Snowboarder Going Around A Purely Carved Turn
As explained in the previous section, making a purely carved turn is desirable for a snowboarder since it minimizes how much he slows down. Thus, it is useful to analyze the forces acting on a snowboarder during such a turn.
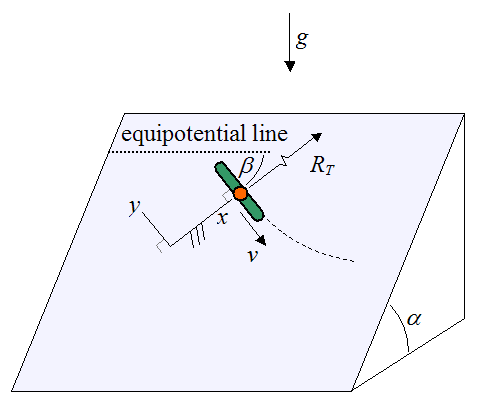
To begin the analysis, we must first define the orientation of the snowboarder on a slope of arbitrary inclination (which is the most general case). This is necessary because the force of gravity affecting the motion of the snowboarder changes depending on which direction he is going along the slope. The figure below shows a schematic defining the orientation of the snowboarder on the slope.
Where:
g is the acceleration due to gravity, which is 9.8 m/s2 on earth
α is the slope angle. This angle is zero for a flat horizontal surface
β is the angle the snowboard makes with the equipotential line along the surface of the slope. The equipotential line is the line of constant altitude, and is perpendicular to the direction of gravity
RT is the radius of the turn
v is the velocity of the snowboarder along the turn, pointing in the direction of the snowboard
The coordinate system xy is oriented such that the y-axis is perpendicular to the surface of the slope, and the x-axis lies along the surface of the slope and is perpendicular to the velocity v of the snowboarder, at the instant shown.
(Note, we are assuming that the surface of the slope is planar and that three-dimensional effects are negligible).
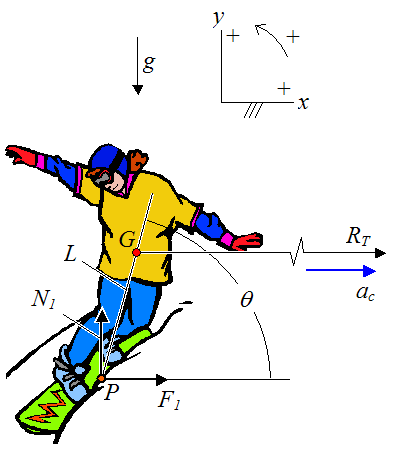
Next, set up the free body diagram of the snowboarder, as shown in the schematic below.
Where:
θ is the angle between the slope (in the x-direction) and the line passing through points P and G. This is defined here as the angle of "lean" of the snowboarder
G is the center of mass of the system (which consists of snowboarder plus snowboard, which together can be treated as a rigid body)
P is the approximate contact point between the snowboard and the snow
L is the distance between point P and point G
ac is the centripetal acceleration of point G. This acceleration is in the x-direction and points towards the center of the turn, at a given instant
F1 is the contact force in the x-direction, with the snow, acting on the snowboard at point P
N1 is the contact force in the y-direction, with the snow, acting on the snowboard at point P
Note that v is the instantaneous velocity of the center of mass G. This velocity is pointing out of the page in the above figure.
The center of mass G has zero acceleration in the y-direction. Therefore, the forces in the y-direction acting on the system must sum to zero. Mathematically this can be written as
where m is the mass of the system (which consists of snowboarder plus snowboard).
Apply Newton's second law in the x-direction:
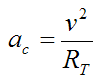
The centripetal acceleration is given by
This equation is substituted into equation (2).
We can approximate the system as being in rotational equilibrium, which means there is zero moment acting on the system about the center of mass G, about an axis pointing out of the page. Mathematically we can write this as
Combine equations (1)-(3) and solve for the angle of lean θ. We get
Note that the mass m and the length L do not need to be known since they cancel out of the equations.
To illustrate the use of the above equation, let's do a sample calculation. For example, let's say at a given instant α = 20°, β = 60°, v = 5 m/s, the sidecut radius RSC = 14.8 m, and the angle of tilt φ = 30°. What is the angle of lean θ?
From before, the radius RT is given by RT = RSC cosφ = 14.8×cos(30) = 12.82 m. Thus, solving for θ we get θ = 68.5° .
When snowboarding on a slope, the radius of the turn RT is not constant throughout a turn, and some variation is normal, especially since the force of gravity relative to the snowboarder (along his trajectory) changes along with his changing angle β on the slope, as shown in equation (2). This naturally changes the angle of lean θ, which tends to change the tilt angle φ the snowboarder makes with the snow. Consequently, this changes the radius of the turn RT. This complicates the physics analysis.
As a final check in the above solution, we must look at the angle of the force applied to the snowboard to ensure that it does not slip on the snow. But before doing that we must first acquire some background understanding, which will be given in the next section.
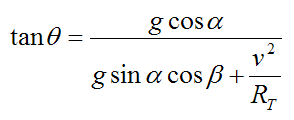
Preventing Snowboard From Slipping On Snow
There are two cases to consider with regards to snowboard slippage and how to prevent it. The first case is when the snowboard is on a horizontal and flat snow surface. To avoid slipping, the force applied to the snowboard by the snowboarder's foot must be perpendicular (at 90°) to the plane of the snowboard in contact with the snow. This is because the friction between the snowboard and the snow is very small so any sideways force can cause the snowboard to move (slip).
The second case is when a snowboard is on a sloped snow surface. To avoid slipping, the snowboard must be pressed into the snow at a certain tilt angle, such that the component of the applied force, parallel to the plane of the snowboard, points into the snow. The schematic below illustrates this.
Where:
φ is the angle of tilt between snowboard and snow, as shown
δ is the angle between the applied force and the snow surface, as shown
ψ is the angle between the applied force and the snowboard, as shown
FR is the resultant force exerted by the snowboarder's feet on the top of the snowboard
To prevent slipping, the angle ψ must be greater than or equal to 90° . This means that the component of FR parallel to the plane of the snowboard, will either be zero (for ψ = 90°), or it will point directly into the snow, towards the right (for ψ > 90°), and the "wall" of snow will prevent it from slipping.
However, if the angle ψ is less than 90°, then the component of FR parallel to the plane of the snowboard, will point outward (towards the left), and the snowboard will slip outward (out of the "trench"). Note that we are ignoring the relatively small weight of the snowboard which would result in the critical angle being slightly different from 90° .
By geometry, this means that for no slipping, δ must be greater than or equal to 90−φ.
We can now check the sample calculation in the previous section, to see if the snowboard slips on the snow.
We must check the angle of the applied force FR acting on the snowboard (exerted by the snowboarder's feet). Ignoring the relatively small mass of the snowboard, this force is equal and opposite to the force exerted on the snowboard due to F1 and N1. Since the system is in a state of rotational equilibrium, the resultant force from F1 and N1 must pass through the center of mass G. This means that the angle δ is the same as the angle of lean θ. Hence, δ = 68.5°, which is greater than 90−φ = 60° . Therefore, the snowboard does not slip.
In the next section we will look at aerial tricks.
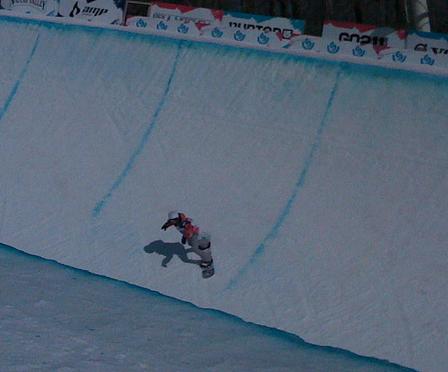
Aerial Tricks
For some tricks, a snowboarder performs aerial acrobatics, spinning and twisting in the air. The basic physics principle at work here is the conservation of angular momentum. The angular momentum of the snowboarder is determined at takeoff (from the ramp), and cannot be changed once the snowboarder is airborne. So to make turns in the air the snowboarder must give himself initial rotation upon takeoff. Once airborne, the snowboarder can alter his body shape in order to produce an impressive aerial display of tricks and twists for the crowd, during which his angular momentum remains constant.
When it comes to aerial tricks, the physics of snowboarding is similar to the physics of skateboarding.
The picture below shows a snowboarder performing a frontside 180.

Source: http://www.flickr.com/photos/f-l-e-x/2319853663
In the next section we will look at pumping on a half-pipe.
Pumping On A Half-Pipe
Pumping on a half-pipe is used by snowboarders to increase their vertical take-off speed when they exit the pipe. This enables them to reach greater height and perform more aerial tricks, while airborne. The principle is exactly the same as for skateboarders pumping on a half-pipe.
The figure below shows a snowboarder in the curved portion of the half-pipe.
Source: http://www.flickr.com/photos/skaty222/3377825536
The figure below shows a snowboarder after he has exited the half-pipe and is airborne.
Source: http://www.flickr.com/photos/26288885@N04/4338676131
The snowboarder is able to increase his speed on the half-pipe with his feet remaining firmly on the board. This begs the question, what is the physics taking place that enables the snowboarder to increase his speed on the half-pipe?
To increase his speed, the snowboarder crouches down in the straight part of the half-pipe. Then when he enters the curved portion of the half-pipe he lifts his body and arms up, which results in him exiting the pipe at greater speed than he would otherwise.
The basic snowboarding physics behind this phenomenon can be understood by applying the principle of angular impulse and momentum.
The schematic in this analysis is given below.
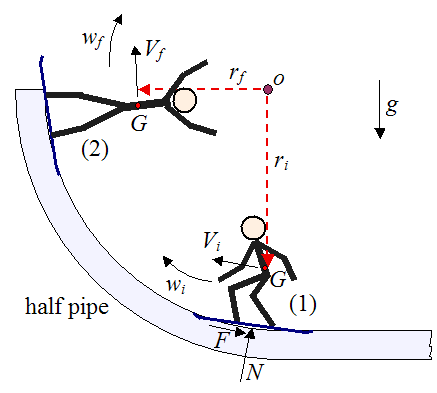
Where:
wi is the initial angular velocity of the body (consisting of snowboarder plus board), at position (1)
wf is the final angular velocity of the body, at position (2), which is the point at which the snowboarder exits the half-pipe
Vi is the initial velocity of the center of mass G of the body, at position (1)
Vf is the final velocity of the center of mass G of the body, at position (2)
ri is the initial distance from the center of rotation o to the body's center of mass G, at position (1)
rf is the final distance from the center of rotation o to the body's center of mass G, at position (2)
g is the acceleration due to gravity
N is the normal force acting on the snowboard, as shown
F is the friction force acting on the snowboard, as shown
It is assumed that the half-pipe is a perfect circle with center at o.
The physics can be analyzed as a two-dimensional problem.
Now, apply the equation for angular impulse and momentum to the system (consisting of snowboarder plus board):
Where:
Ioi is the initial moment of inertia of the body (consisting of snowboarder plus board) about an axis passing through point o and pointing out of the page, at position (1)
Iof is the final moment of inertia of the body (consisting of snowboarder plus board) about an axis passing through point o and pointing out of the page, at position (2)
ΣMo is the sum of the moments about point o. These moments are integrated between an initial time ti (at position 1) and a final time tf (at position 2)
Here we are assuming that the body can be treated as rigid at positions (1) and (2), even though the snowboarder does in fact change his moment of inertia between these two positions. But as it turns out, when using this equation we only need to know the initial and final values of the moment of inertia of the body.
The line of action of the normal force N passes through point o, so it does not exert a moment on the body about point o. The friction force F is small so it can be neglected in terms of its moment contribution. This leaves only the gravitational force which exerts a moment on the body about point o. (Note that the gravitational force acts through the center of mass of the body, consisting of snowboarder plus board).
In the above equation isolate wf. Thus,
Now,
Where:
IGi is the initial moment of inertia of the body about an axis passing through point G and pointing out of the page, at position (1)
IGf is the final moment of inertia of the body about an axis passing through point G and pointing out of the page, at position (2)
m is the mass of the body
In the above equation for wf, if we decrease Iof the angular velocity wf will increase beyond the value it would be if we did not decrease Iof. In practice this can be accomplished by sufficiently reducing the distance from the center of mass of the body G to the point o. In other words, make rf small enough and wf will increase. Note also that the terms IGf and ΣMo may also change somewhat. But the dominant effect will be that of reducing rf.
At positions (1) and (2), the velocity of the center of mass G is given by
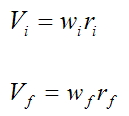
These two velocities are parallel to the half-pipe since the body is rigid at positions (1) and (2).
Looking at the above equations for velocity, if the snowboarder makes rf small enough (by lifting his body and arms up), he will significantly increase wf. This in turn will result in his velocity exiting the pipe (Vf) being greater than if he did not lift his body and arms up.
By continually pumping his body (by crouching down and lifting his body and arms up in the curved portion of the half-pipe), the snowboarder is able to continually increase his velocity, eventually allowing sufficient height to be reached (upon exiting the half-pipe) to perform a variety of mid-air tricks.
A more intuitive (non-mathematical) explanation of the physics taking place here is that pumping adds energy to the system in the same way that a child pumping on a swing adds energy, and results in him swinging higher. Therefore, the physics of pumping on a half-pipe is similar to the physics of pumping on a swing.
As a snowboarder lifts his arms and body up he feels resistance due to the force of centripetal acceleration which tends to push his body away from the center of rotation o. This resistance is proof that work is being done, and therefore energy is being added to the system.
If you want to see a really interesting problem related to the physics of snowboarding, check out this analysis for determining the optimal trajectory for a maximum jump on a half-pipe.
In the last section we will look at basic snowboard maintenance required for optimal performance.
Snowboard Maintenance
Good snowboard maintenance also ties into the physics of snowboarding by optimizing the performance of the snowboard on the snow, as explained in the points below
• Waxing the bottom of a snowboard protects it from wear and water penetration, the latter of which can damage the snowboard. Wax also makes the bottom of the snowboard waterproof, reducing wet-drag (suction) friction, which is caused when excess water collects at the bottom of the snowboard.
• The edges of the snowboard must be kept sharp using a stone grinder, much like skate blades, to allow for easier turning and edge control.
Return to The Physics Of Sports page
Return to Real World Physics Problems home page
Free Newsletter
Subscribe to my free newsletter below. In it I explore physics ideas that seem like science fiction but could become reality in the distant future. I develop these ideas with the help of AI. I will send it out a few times a month.