Science Fair Project Ideas
If you're looking for science fair project ideas you came to the right place! On this page you will find several ideas for cool science fair projects, for kids of all ages. These projects are particularly interesting because they have practical relevance in real life, and you can use common everyday materials to create them. These project ideas are mostly physics based. For the most part I have worked on these projects myself, and have included pictures for your benefit.Make sure you have adult supervision and assistance, where required, when working on these projects.
Science Fair Project Ideas – Insulation Testing
This is one of the more practical science fair project ideas since it relates to insulation, which is a common material in home construction. I tested the insulation value of some common materials to see which one worked best. The pictures below show pictures of the basic set up I used.
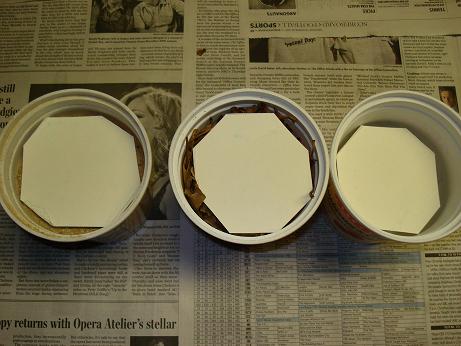
The figure below shows three large yogurt containers with smaller cups inserted inside. In the space between cup and container (including the space underneath the cups) I placed insulation material. The first cup on the left has sawdust as insulation. The cup in the middle has leaves as insulation. The cup on the right has no insulation – this is the control which serves as a base reference used to compare the effectiveness of the insulation materials.

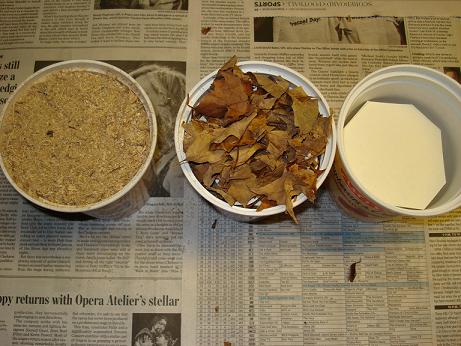
Inside the cups you place equal amounts of ice, by weight, from the same freezer. The goal is to see which cup slows down the melting of the ice the most. This tells you which insulation material works best.
After you have placed the ice inside the cups you can seal them. What I did was place a cardboard lid on the cups, and on top of the lids I placed insulation material (for those two cups where insulation material was used) – this way you have insulation all around. This set up allows you to easily check how fast the ice has melted after some time has passed. This set up is shown in the figures below.
From these test results determine which insulation material works the best. Explain why. Hint: Trapped air is a very good insulator. Tie this into your experimental results.
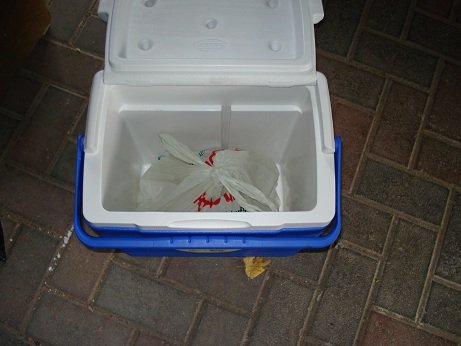
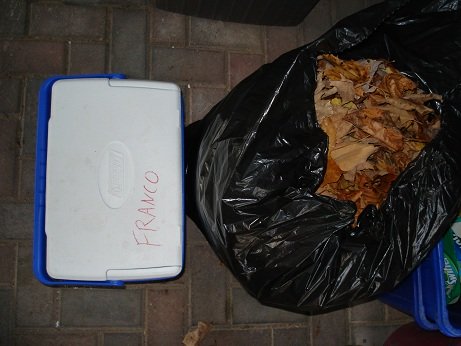
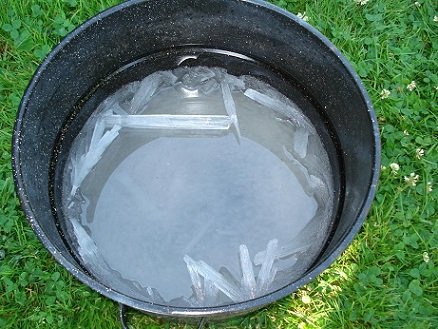
Another fun experiment is comparing the insulation value of leaves versus that of a common cooler. To test this out get two identical bags containing identical amounts of ice (by weight), both from the same freezer, and place one bag inside a garbage bag full of leaves and the other bag in the cooler. You may close both bags or leave both bags open.
The figure below shows a cooler containing a bag of ice.
The figure below shows a garbage bag filled with leaves, with a bag of ice on top.
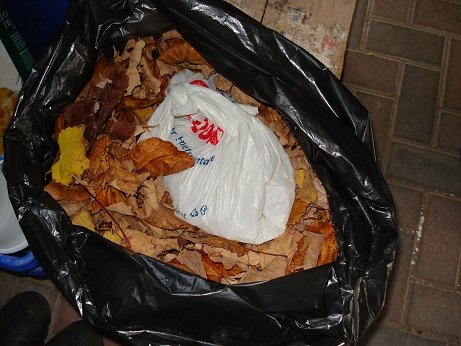
The figure below shows the cooler with the lid closed (sealing the bag of ice inside), and the bag of leaves with the bag of ice buried within it. Your task is to determine whether the cooler or the bag of leaves, as shown, preserves the ice the longest. Time how long it takes for the ice to melt completely, both in the cooler and in the bag of leaves. Based on this, which is the better insulator?
Science Fair Project Ideas – Calcium Chloride As A Natural Dehumidifier
This is one of those project ideas that touches close to home. Dehumidification is often very important in homes for reasons of comfort and to prevent moisture related damage. Not many people know it, but Calcium Chloride salt has an amazing property. It absorbs water from the air, meaning that it acts as a natural dehumidifier. It can work just as well as an electric dehumidifier but minus the electrical cost.
Calcium Chloride is easy and inexpensive to get. It is the ingredient in several deicers used to melt ice and snow. So you can buy it in stores during the winter months. If you don't see the name "Calcium Chloride" on the deicer, look for CaCl2. This is the chemical name for it. The figure below shows a bag of Calcium Chloride deicer, which is what I used in my experiments. The product name is Dow Flake XTRA, 83-87% pure Calcium Chloride.

To observe the properties of Calcium Chloride, sprinkle it in a large shallow container with a large area, as shown in the figure below. If you don't have a large container you can just use a regular pan. Make sure the container, or pan, don't leak underneath, since it would be messy to clean up.
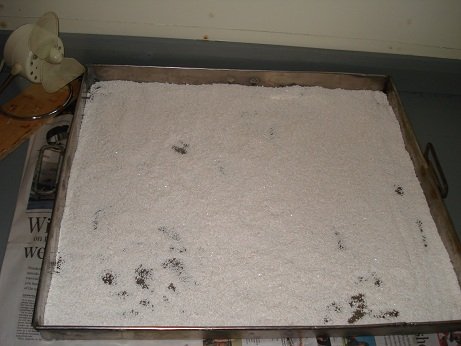
To increase the rate of water absorption by the Calcium Chloride place a fan near the container, facing towards it. The flow of air over the Calcium Chloride will help it to draw in more water from the air.

After 2-3 days it should be completely saturated with water, and you will have a brine. To regenerate the salt so that it can be used again, you can place the brine in a metal pot over an outdoor barbecue. The high heat will evaporate the water allowing you to reuse the salt. But make sure you use an old pot since you will probably have to pound the pot with a rubber mallet to get the salt out after it dries.
You can also use the sun's heat to evaporate the water making this 100% free in terms of energy usage. You can do this by placing the brine in a shallow metal tray, under direct sunlight during the summer. The sun's heat will evaporate most of the water. You can concentrate the sun's heat by placing plexiglass, a clear plastic sheet, or saran wrap over the tray. This intensifies the sun's heat just like a greenhouse does. Make sure to create a small opening so that the evaporated water can escape from the tray into the air. Again, not all the water will be evaporated from the salt. This is because the heat won't be high enough to drive off all the water. Explain the reason for this.
Even though you won't be able to evaporate all the water from the salt using the sun's heat, you can still use the salt again in its brine state to remove moisture from the air. The salt only stops absorbing water after it saturates, meaning it can't absorb anymore water. At this point you have to either evaporate the water, as was just described, or use new salt. But don't just dump the unwanted salt brine down the sink. If you want to know how to dispose of it read the instructions that come with the salt, or contact the manufacturer to find out how.
The figure below shows a pot of Calcium Chloride brine with most of the water evaporated. Notice the neat looking crystal shapes that have formed. It looks like something from Superman's fortress of solitude. Explain these crystals and why they form after some of the water has evaporated. Crystal formation is always an interesting topic worth considering when exploring science fair project ideas.
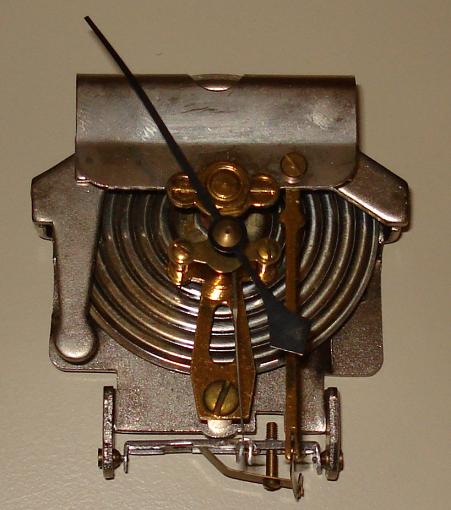
Science Fair Project Ideas – How A Barometer Works
This is one of those project ideas that involves taking something apart and figuring out how it works. Most of us have seen barometers that use dials to read pressure. But how do they work? If you take one apart you can find out how. Here's the basic principle behind it: A partially evacuated sealed metal chamber responds to changes in air pressure by flexing. This flexing moves delicate levers which are attached, via an intricate mechanism, to a dial. Therefore when the air pressure changes, the dial turns. It's all calibrated of course. The challenge is to describe the movement of the dial in mathematical terms (depending on your grade level), and understanding how the mechanism, which turns the dial, works.
Another good question is, is it possible for the dial to turn in response to changes in air temperature without any changes in air pressure? What is the reason for this?
The figure below shows the mechanism from an old barometer I took apart.
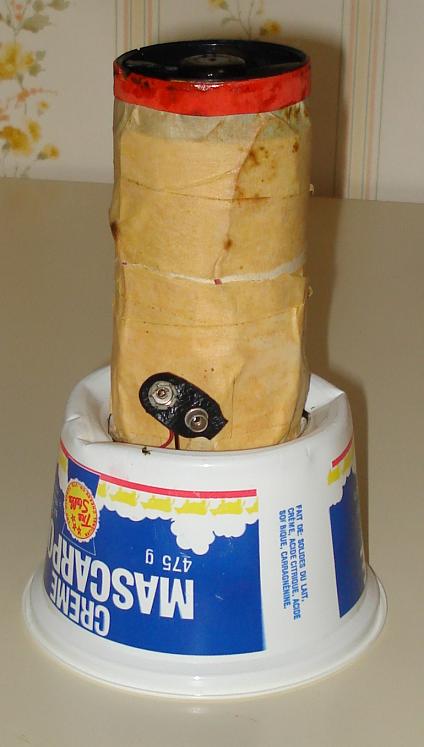
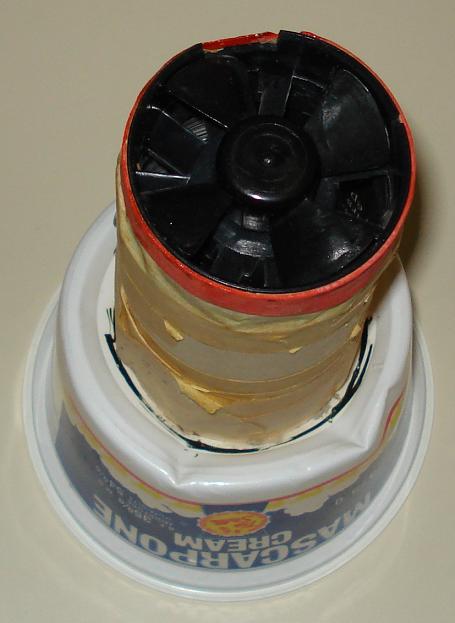
Science Fair Project Ideas – Miniature Homemade Hovercraft
This is one of those very simple, very interesting, and rarely mentioned science fair project ideas. You can actually make a small hovercraft using everyday materials. Using two blowdryer fans, connect them in series using tape, and wire them so that they can be powered by an external power source. For safety reasons, the power requirement should be low, so the power source should be either batteries, or a small toy transformer; such as the kind used for toy trains.
You then insert the fan assembly into a hole cut into a plastic container, such as a margarine container. When you turn the fans on, they blow air into the container which pressurizes the chamber, causing the container to lift off the floor. The result is a miniature hovercraft that floats on a thin cushion of air. The figures below illustrate the construction.

You can easily build one yourself, perhaps experimenting with only one fan instead of two. You can then describe the physics behind the lift. The lift is generated by pressurization of the chamber which causes separation between the surface and the container. The separation gap is such that the internal pressure force inside the chamber is equal to the weight of the hovercraft. You can have a lot of fun playing with this, and since it essentially floats on a cushion of air it will be very easy to move around on the floor. Use the concept of friction to explain why this is. In fact, friction is another topic to consider when exploring different project ideas.
Science Fair Project Ideas – Cement Curing Temperature
This is one of those project ideas that involves some DIY (Do It Yourself) skills, which is perfect if you like getting your hands dirty.
Steam curing is a common practice in the manufacture of concrete blocks. Concrete blocks, after they come out of a block machine, go into kilns where steam is injected. The high temperature steam causes the cement inside the concrete blocks to cure much more quickly than it would if just left to cure under normal ambient conditions. This is ideal since it maximizes manufacturing output. Curing is a chemical process in which cement hardens and gains strength. During this process cement generates heat by way of a chemical reaction, known as the heat of hydration. You can observe this in an experiment using test samples of cement you set up at home.
To prepare the test samples use Portland cement and mix it with water. Use a weight ratio of water/cement of 0.34. This approximates the ratio used in industry. Place this water-cement mixture in a small mold made from PVC pipe cut into a short length (as shown below). In this picture, the dimensions of the samples are approximately 34 mm in height and 34 mm in diameter, but you don't have to use exactly these dimensions. I made nine samples for the particular experiment I did, for reasons outside the scope of this project. But you only need to make one cement cylinder at a time for this particular experiment. You'll want to repeat this experiment several times though, which means making a cement cylinder for each individual test. This gives you a sense of how repeatable the results are, which is important from a scientific point of view.

Allow the cement cylinder to "sit" for 4.5 hours and then remove it from the PVC mold. It's a good idea to cut the PVC mold into equal halves and wrap tape around it so that when it comes time to remove the cement cylinder you can unwrap the tape and separate the two halves, allowing for easy removal. The 4.5 hours roughly mimics the setting time that concrete blocks are subjected to before going into the kiln. Next, drill a hole in the top center of the cement cylinder. It will be hardened enough to drill a hole into it at this point. This hole must be just big enough to allow for snug insertion of a temperature probe. This can be any digital temperature probe, as used for kitchen purposes. Make sure the upper temperature limit of the probe is well over 100 degrees Celsius.
Put the cement cylinder inside a miniature curing chamber made out of wood, as shown in the figure below.
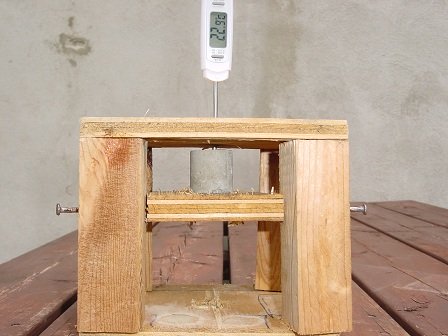
The top of the curing chamber has a hole in it through which the temperature probe slides though and into the hole in the cement cylinder.
Place the curing chamber on top of a large metal pot of boiling water, supported underneath. I used an old metal tube placed inside the pot, which sits above the surface of the water, and the curing chamber sits on top of that (as shown below). The water is boiled using an outdoor barbecue, as shown below. Note that the curing chamber has an additional hole through which another temperature probe is inserted. This probe is for measuring the curing chamber temperature. The probe inside the cement cylinder is for measuring the cement cylinder temperature.
Since we are dealing with boiling water and high temperature make sure you have adult supervision when doing this experiment.
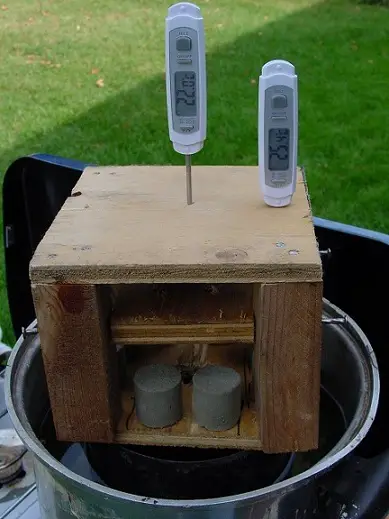
In the figure above disregard the two cement cylinders shown in the bottom compartment of the curing chamber. They were used for reasons outside the scope of this project.
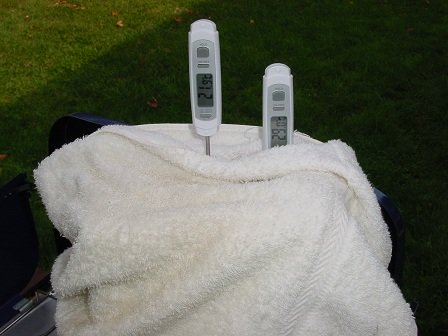
Lastly, place a towel around the curing chamber, as shown below. This helps seal the steam (generated by the boiling water) inside the curing chamber. Make sure the towel can resist the heat. And make sure it doesn't touch the burner or heating element. This is just one more good reason to do this experiment outdoors.
Note that you should try to place the cement cylinder inside the curing chamber soon after you drill the hole in it (to insert the temperature probe). Try to take only a few minutes to do this. Ideally, we want the cement cylinder to go into the steam curing chamber right after the 4.5 hours sitting period.
Every five minutes measure and record the temperature readings of the cement cylinder and the curing chamber using the two temperature probes. You will notice that the temperature of the cement cylinder is initially below that of the curing chamber temperature, and then it reaches a point where it surpasses the curing chamber temperature. This is due to the exothermic chemical reaction of the cement as it hardens. The high temperature steam accelerates this chemical reaction which is why, if the curing chamber (steam) temperature is too high, the cement cylinder temperature can shoot up drastically, reaching over 100 degrees Celsius. Explain this in more detail.
Try experimenting with not putting a towel around the curing chamber, putting a towel partially around the curing chamber, and completely covering the curing chamber with the towel. Record how this affects the curing chamber temperature and cement cylinder temperature, over time.
Since the boiling temperature of water is 100 degrees Celsius, the curing chamber temperature will never exceed this.
The total recording time from when the cement cylinder is placed inside the curing chamber, should be about 10-12 hours. This mimics the actual curing time of concrete blocks inside kilns.
Science Fair Project Ideas – Homemade Air Conditioner
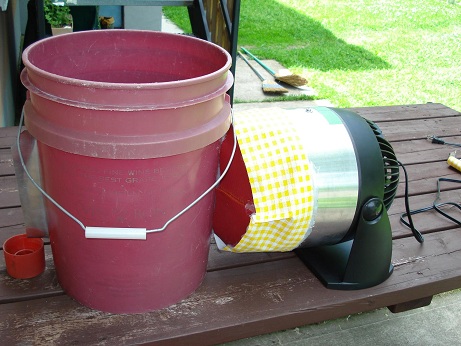
You can add this to the list of DIY (Do It Yourself) based project ideas. This is a fun project for the summer months. First, get a 20 liter plastic container and insert a flattened metal tube through it, as shown in the two figures below.

Next, seal the interface between tube and plastic container with silicone. This prevents water from leaking out.
The idea here is that you fill the container with cold ice-water and then blow air through the tube using a fan. The air exits the tube cooler than it was going in, due to heat exchange between the cold ice-water and the air flowing through the tube. It's fairly self-explanatory. On the end of the tube where the air enters you need to make a type of funnel which fits around the fan and channels the air into and through the tube. To do this I used a combination of rubber sheet, old tablecloth, and aluminum sheet. The three figures below illustrate this.
Experiment with different fan speeds and measure the air temperature of the air exiting the tube. Compare this to the air temperature going in. Try making the tube gap narrower (flatter) or wider (less flat) to see how this affects the exit air temperature. What happens to the air speed through the tube the narrower (flatter) it becomes? Why is this? Comment on the apparent trade off between fan power and the level of cooling due to a narrower or wider tube gap.
You can make ice for free for this DIY air conditioner. On winter days where it's -18 degrees Celsius or colder (-18 degrees Celsius is typical freezer temperature), you can freeze water outdoors and then store it in your freezer for use in the summer. This way you don't use any electricity to freeze the water in the freezer. This saves money, and it's actually good to have a freezer full of ice anyway. It runs more efficiently because it uses less energy to maintain the internal temperature when you open and close it. Looking at ways to save energy, as just described, is always a good topic to consider when exploring different project ideas.
Science Fair Project Ideas – Radiant Cooling
This is among the more advanced of the project ideas. The purpose of this experiment is to observe the level of radiant cooling during clear cloudless nights. Radiant cooling is caused by the loss of heat due to thermal radiation emission. Radiation is one of the modes of heat transfer, in addition to conduction and convection. A clear, cloudless night (where you can see the stars) allows an object to transfer heat energy (by way of thermal radiation) to the night sky, where the night sky is simply a "very cold object" into which heat energy is transferred. This is the same as transferring heat from a hotter object to a colder object by bringing them into physical contact.
This is an easy experiment to set up. You can use an everyday tin container and place a temperature probe inside it, taped to the bottom, as shown. You then place a sheet of styrofoam underneath the container and wrap an old newspaper around the outside of the container. This serves to help insulate the temperature probe from unwanted heat sources, such as the ground and the outside air around the container. This helps ensure that the main source of heat transfer comes from radiation exchange with the clear sky, directly above the temperature probe, which is what we are controlling for in this experiment.

This is the procedure: You place the container and probe outside on a clear cloudless night. In the first part of the experiment you leave the top of the container open and then record the temperature of the probe after it reaches a steady value. In the second part of the experiment you cover the top of the container with a sheet of polyethylene plastic, as shown, and measure the temperature of the probe after it reaches a steady value. The polyethylene plastic sheet is "transparent" to thermal radiation meaning that it will allow the heat loss of the probe, due to radiation, to pass through the plastic sheet. But the plastic sheet also helps insulate the probe from heat loss due to convection effects with the air. Therefore, by measuring the probe temperature with the plastic sheet present, you can better account for the effect of heat loss due to thermal radiation heat loss to the night sky. When doing this experiment also measure the temperature of the outdoor (ambient) air and factor that into the difference in probe temperature readings (if any) with and without the polyethylene plastic sheet present.
Science Fair Project Ideas – Parabolic Solar Reflector
This falls under the solar energy category. You can make a parabolic solar mirror to reflect sunlight to a point, much the same way a magnifying glass focuses the sun’s light to a point.
Making the solar mirror is simple. The materials you need are:
• A rotating platform on top of which a container can rotate
• Plaster-of-paris (roughly 2.5 litres or 2500 mL)
• A container with inside diameter of roughly 10.5 inches
• A large potato chip bag (with shiny metallic surface on the inside)
The liquid plaster-of-paris will be placed inside the container, and the container will be made to rotate about its center at roughly one revolution per second. Due to the nature of the physics, this will cause the surface of the plaster-of-paris to form a parabolic shape. Upon hardening, the plaster will retain this shape.
Mathematically, the parabolic shape is defined by the equation y = w2x2/(2g), where w is the rotation rate in radians/sec, and g is the acceleration due to gravity, which is 9.8 m/s2.
To make the rotating platform you may have to get creative. One way is to get an old turntable and place the container on top, or use a motor-gearbox-pulley combination to rotate the container at one revolution per second. I don’t have pictures of the turntable I made as it was quite a few years ago and I have since dismantled it.
Once you’ve made the plaster shape, it’s time to create a mirror surface on it. This is where potato chip bags come in handy. It’s a cheap way to make a shiny reflective surface.
Clean out the inside of the chip bag with detergent. Then cut pie shaped pieces out of it and glue them onto the surface of the dish, shiny side up. This will create the mirror surface, as shown below.
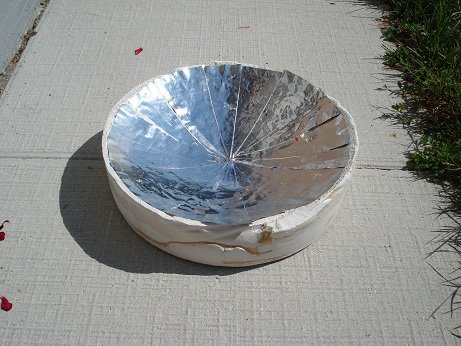
When the sun is out, orient the dish so that it directly faces the sun. The focal point will be roughly five inches from the bottom. Mathematically, the focal distance (f) is given by f = g/(2w2).
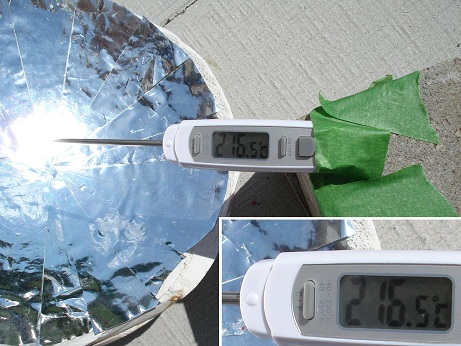
You can find the hot spot by moving your finger along the space above the center of the dish until you feel it. That’s your focal point. It can get very hot so be careful. Using a digital kitchen thermometer I measured a temperature of over 200 degrees Celsius! Make sure the upper temperature limit of the thermometer is above 200 degrees Celsius. Again, be careful, and protect your eyes from the very bright concentrated sunlight. See the figure below to see how I safely measured the temperature.
Science Fair Project Ideas – Solar Heating
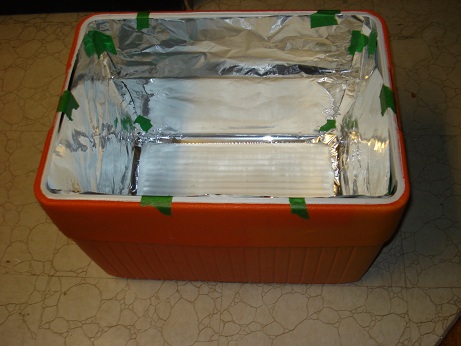
This also falls under the solar energy category. This is an experiment where you convert a cooler into a solar heater.
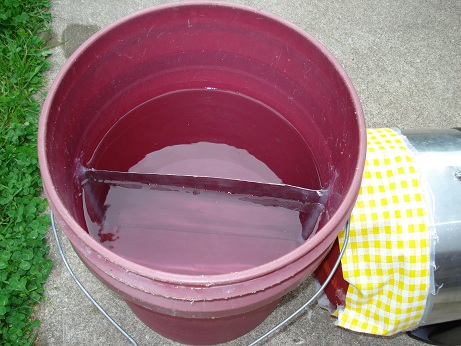
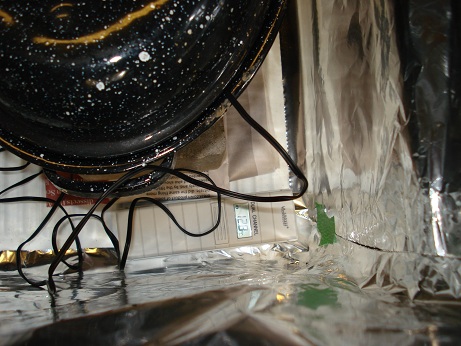
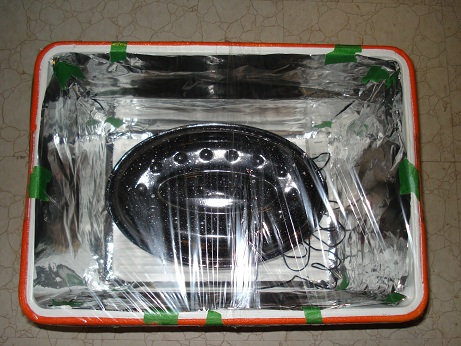
First, tape aluminum foil on the inside surface of the cooler, as shown.
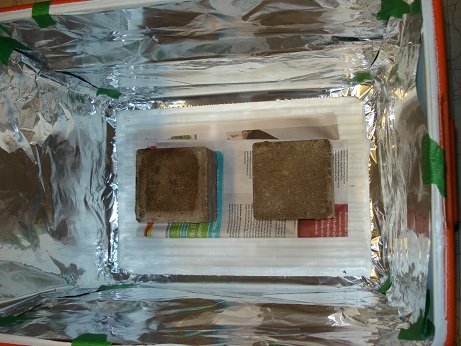
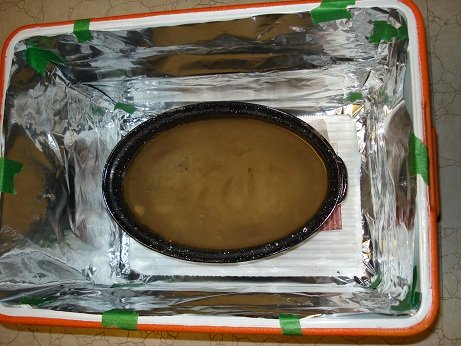
Next, place bricks on top of an old newspaper and put a black pot, filled with water, on top of that. The bricks serve to elevate and support the pot. This is useful in case the pot gets too hot for direct contact with the plastic lining of the cooler.
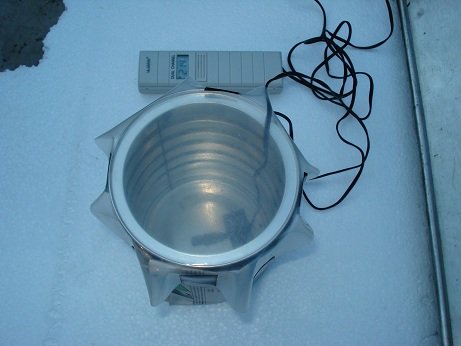
To monitor the temperature you can use a Wireless Weather Station (shown below), which is not very expensive. I used two of them for this experiment.
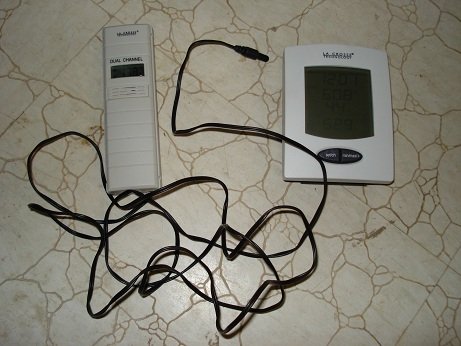
Place the temperature sensors inside the cooler to measure the water temperature and the ambient temperature inside the cooler.
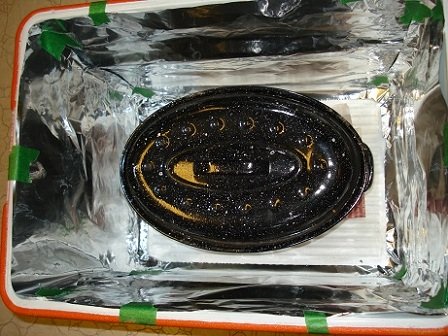
Lastly, cover the top of the cooler with saran wrap and place it outside. When it's sunny, the saran wrap turns the cooler into a type of greenhouse which helps to trap the heat of the sun inside the cooler, gradually warming up the inside. The aluminum foil on the inside of the cooler serves to reflect sunlight towards the pot, heating it up. The black color of the pot will enable it to heat up efficiently. The cooler itself, due to its insulation value, reduces heat loss from the sides and bottom.
Measure the temperature inside the cooler and the water temperature inside the container, when it's cloudy and when it's sunny. Comment on the difference.
This experiment illustrates the basic principle behind solar heating. It's often used as a means to pre-heat water and reduce energy bills. Out of all the solar energy options, solar water heating is actually one of the least expensive, costing a few thousand dollars to implement for the average household.
Science Fair Project Ideas – Basic Helicopter Physics
This is also more advanced among the project ideas, since it touches on aerodynamics. In this experiment you basically show how helicopters fly. You can buy an inexpensive toy helicopter and use it to illustrate the basic principles of flight of a helicopter.
A helicopter lifts itself off the ground by rotating the main top rotor (propeller) at high speed. This large rotating propeller "pushes" air downward, and (by Newton's third law) creates an opposing upward force which lifts the helicopter up and off the ground.
Some toy helicopters use two propellers, one on top of the other, which rotate in opposite directions. This opposing rotation prevents the helicopter body from spinning. If only one propeller is used, the helicopter body would spin in the direction opposite to the propeller's rotation. This is due to the rotational force required to keep the propeller spinning. By using two counter rotating propellers this rotational force cancels out and the helicopter body doesn't spin.
Real life helicopters typically use a single main rotor and a tail rotor (which is also a propeller). This tail rotor creates an opposing force preventing the helicopter body from rotating due to the rotation of the main rotor. If a tail rotor were not used the helicopter body would rotate in the direction opposite to that of the main rotor.
How does a toy helicopter move forwards and backwards? By observing the motion of one you can figure out how it does this. How does this compare to how real life helicopters move forwards and backwards?
Science Fair Project Ideas – Fun With Circuits
If you're looking for project ideas that involve electricity and magnetism, you can use a circuits kit to investigate different circuit designs, and in the process you can illustrate numerous interesting physics concepts involving electricity and magnetism.
The purpose of listing different project ideas is to inspire you to think about different topics and hopefully get you to stumble upon a topic that really interests you.
Some websites list many more project ideas than I do here. That can work well too. However, I choose to list fewer topics but explain them in more detail. This has the advantage of giving you broader perspective on the topic.
Here are some more project ideas:
Egg Drop
Pasta Bridge
Return to Real World Physics Problems home page
Free Newsletter
Subscribe to my free newsletter below. In it I explore physics ideas that seem like science fiction but could become reality in the distant future. I develop these ideas with the help of AI. I will send it out a few times a month.