Cheap Energy
So-called cheap energy ideas for the average person, which often sound promising, typically suffer from "devil in the details" type of problems. You start trying to figure out how to implement them and then difficulties start to become evident, whether they are related to unexpected costs, difficulty in construction, practical problems, etc. Ultimately, cheap energy, in keeping with the spirit of free energy, must come from something that is freely found in nature, which doesn’t cost anything in its raw form, such as solar energy, wind energy, or energy from burning wood or other biomass.The question then becomes, what device, or devices can I use to extract useful electrical/mechanical energy from these renewable energy sources that would cost as little as possible, and/or require minimal effort, to construct or buy? The main options to choose from in the area of renewable energy is solar, wind, hydro, geothermal, tidal, wave, and biomass. Out of all of these options, the most readily available to the average person is solar energy and biomass. Wind energy is also an option, but it is strongly geography dependent. In truth, all these energy options are very viable in certain locations more than others. But on average, solar and biomass is what is accessible to most people most of the time, and it is what the average person should focus on in order to obtain "homemade" low-cost energy/electricity without having to rely on a utility company. This is perfect for the off-grid folks.
Let’s talk about solar energy first, for which you have several options from which to obtain useful energy. They are, solar panels or solar thermal heat (which can be from concentrated sunlight with mirrors or from non-concentrated sunlight using flat plate solar collectors). The solar panels are self-explanatory. You just buy them and install, and you get instant electricity during the day. The solar thermal route however, involves several options, such as a power tower and parabolic troughs – both using a steam power plant to generate electricity, or a Stirling engine – using the Stirling cycle to generate electricity. The power towers and parabolic troughs always involve large installations which means that they are out of the question for individuals.
The Stirling engine however, can work, but costs a lot to buy, or requires lots of time and effort, and significant cost, to build for an individual – at least one that produces significant power – which is what we obviously want. There’s no way around it. Unless enough people buy this engine and the economics of scale kicks in, then the average individual will not bother buying one, or building one. The purchase of this engine will then be restricted to more wealthy individuals, companies, and research facilities/schools.
So what to do? The best solution for the harvesting of solar energy which the average individual can quickly implement, is solar panels (photovoltaics). If you want 100-200 watts of power, get a solar panel that is about 1 square meter in area and you will get that power. It might cost you $100-200 but it’s guaranteed to work. Instant power during the day, more so when the sun is shining than when it is cloudy, but essentially power on demand. And easy to carry around too, relatively speaking, if you choose. There’s solar panels that can even fold up to take up less room when you are carrying them around. Of course, if you are an off-grid traveler, it's a good idea to have battery storage when using solar panels. But they they can be heavy, certainly heavier than solar panels. Ultimately we want low-tech solutions. Solutions with a lot of technological requirements (such as machines) are fine but their cost must be low and that is not the case unless they are mass produced.
The figure below shows a typical solar panel setup for a home.
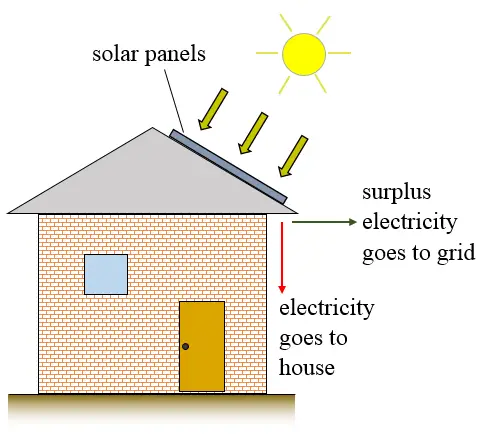
In this setup, electricity produced from the solar panels is fed into the house for normal home use (such as for appliances), and any surplus electricity produced (which exceeds the electricity consumption of the house), is fed back into the electricity grid. You are paid by utility companies for this surplus electricity. The electricity produced by the solar panels that is used by the house, translates directly into savings on the electricity bill, since this is electricity consumption that you don't have to pay a utility company for. Any surplus electricity produced that is sent to the electrical grid is "sold" to the utility company. The combination of energy savings and making money from surplus electricity, can mean a significant lowering of your energy expenses.
The number of solar panels that would work for your household needs depends on your electricity consumption, and on your desired payback period. The payback period (in years) is the initial cost of the solar panel installation, divided by: The yearly amount of money saved plus the yearly amount of money made from the sale of surplus electricity. Summer months are going to be the best months for solar panel electricity production, and for winter months not as much. However, in winter you may want to keep snow off the panels in order for sunlight to reach them, since snow covered panels won't produce electricity. The typical payback period for solar panel home installations is 5-10 years.
Furthermore, solar water heating can be used too, which preheats the water in your hot water tank, meaning that less energy is needed to heat the water to its set temperature. This will save money on water heating. The figure below illustrates this.
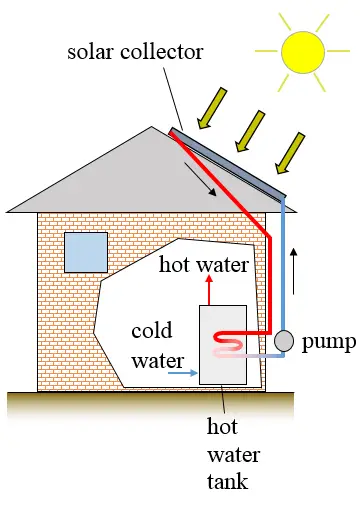
In this setup, solar energy is captured by the solar collectors, and is used to heat a water based liquid (antifreeze solution). This heated liquid is then pumped from the solar collectors, via pipes, into a hot water heater where it passes through a heat exchanger. This heat exchanger enables the transfer of heat energy from the solar heated liquid to the water inside the tank. As a result, the water inside the tank, which is fed from the (cold) city water supply, does not need to be heated up as much as it would otherwise. Once the solar heated liquid exits the tank it is pumped back up to the solar collector where it is once more heated up by the sun, and the cycle repeats. The typical payback period for solar water heating is 2-5 years. This makes it one of the more attractive options for homeowners. Just as for solar panels in the winter months, solar collectors must also be kept clear of snow to maintain their functionality.
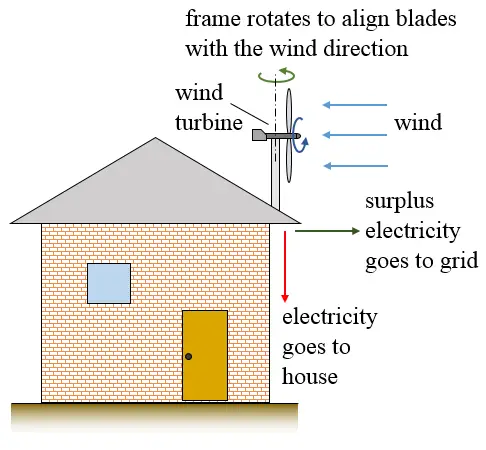
Wind energy is another option, but for the average person it's not nearly as feasible as using solar energy for electricity generation. Using wind energy only makes sense in locations where the wind is constantly blowing, and/or when solar is not available, such as at night. The figure below shows a typical set up using a wind turbine mounted on a rooftop. For optimal operation, the wind turbine frame rotates automatically to face the wind direction head-on. This is done in order to obtain maximum turbine rotation speed, which results in maximum electricity production.
Next, I want to talk about biomass. This type of free energy is always available, anywhere there’s wood, or other biomass available, which can burn. If you burn it, you can get power (somehow). This is ideal for a Stirling engine, which can use any heat source to run. But again, you still need a Stirling engine, which takes lots of money to buy, or build. As mentioned, economics of scale is the only way to make this option viable for the average person. In a similar vein, a steam engine would work too, but again, it can be costly to buy, plus you need a constant supply of water for the steam generation, which is another problem.
Believe me, I really wrestled with this dilemma. I was asking myself, how in the world do I easily produce electricity from the burning of biomass? It seems so straightforward, yet deceptively so. I thought of other options, such as solar chimneys, which are easy to build. But they would be too large and produce too little power for their size.
Eventually I settled on the idea of using pressurized air. I got this idea from knowing about the Compressed Air Car, which uses compressed air to power an engine which drives the car. But for my idea you use a sealed steel tank that’s not necessarily pressurized with air initially, since that would require energy to do so, and you must assume that you have no initial (free) energy to begin with.
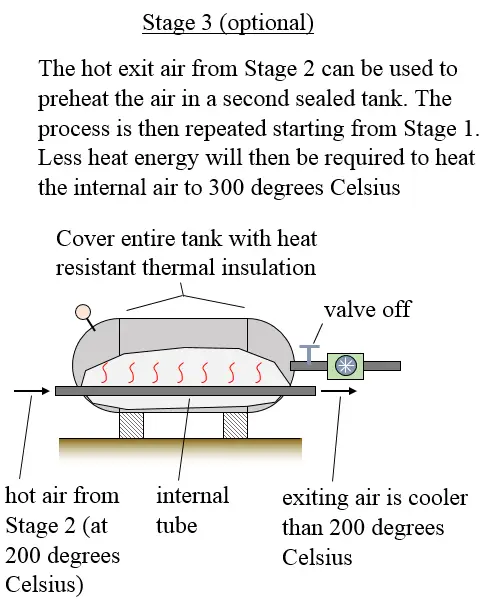
What you do is heat the tank by lighting a fire underneath it. The tank gradually builds up pressure inside (since it is sealed). Then when you are done heating the tank, you release the pressurized air from the tank and it can run a simple turbine which can run a generator which can produce electricity. Think about it, all you need is a strong steel tank, strong enough to withstand the internal pressure, and you heat it with a fire from burning biomass. You then produce electricity (for free) from releasing the air. It doesn't get simpler than that. I figure that heating the air inside the tank to 300 degrees Celsius is a good temperature, that will fall well within the strength limits of the steel tank when pressurized. The figures below illustrate the basics of the system. Stage 3 is an optional stage used to improve the efficiency of the system.
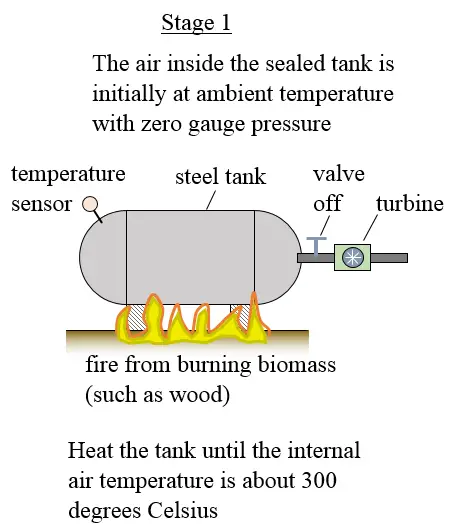
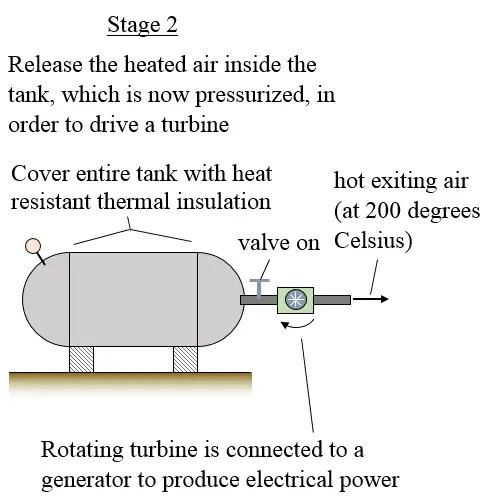
It should only take a few minutes to heat the air inside the tank to 300 degrees Celsius. I did a thermodynamic analysis, and I worked out that, upon releasing the pressurized (and heated) air, you have an hour of power at 30 watts, or half an hour of power at 60 watts, or 15 minutes of power at 120 watts, etc. I base this (approximate) calculation on a tank with an internal volume of 1 cubic meter. If you want more power, simply open the valve more, and more air will escape, which will produce more power.
Given the high temperatures involved there are important safety concerns that must be addressed. Read on and I'll discuss them. Ultimately, this system must be evaluated by qualified people who are directly involved in the design and construction of this system. The information on this page is a good "launching off" point for this undertaking.
I'm not sure about the exact energy efficiency of this setup but the theoretical thermal efficiency (work energy output/heat energy input) is about 50%. But this assumes an ideal case where all the heat energy of the fire goes into heating the air inside the tank, and the air exits the tank in an idealized way, with no frictional flow losses. And there's also generator inefficiency where not all the energy of the spinning turbine will be converted into electricity.
In reality, some of the heat energy input from the fire is lost to the environment, and some of the energy output is lost to flow friction and generator inefficiency. So the overall thermal efficiency, as a ratio of electrical energy output, to heat energy input, will probably be 20-30% at best. That's pretty good, but you can also look at this another way. The efficiency likely won't matter much in this case as long as the source of energy used is free or low cost (it is), the setup is simple (it is), and the power produced is appreciable (it is); which means that you can run most appliances/gadgets with it.
I worked out that if you heat up the air inside a sealed tank with 1 cubic meter internal volume, to 300 degrees Celsius, then the pressure inside will roughly double (based on the ideal gas law). This means that the absolute pressure inside the tank will be 2 atmospheres. Assuming zero initial gauge pressure inside the tank, you will then get an output energy of about 130,000 joules from the tank. This translates into about 30 watts of power for an hour (after accounting for losses) if you release the air in a controlled manner – which you can do with a valve. An internal air temperature of 300 degrees Celsius is a safe amount I think, in terms of being well within the structural strength limits of the steel tank. If you want more power, release the air at a faster rate, but it won't last as long. So either make the tank bigger, or use more than one tank.
Here are some important details on this system:
• You get an airtight and strong steel tank (a pressure vessel) filled with air, at 0 initial gauge pressure inside the tank, and then heat it using a wood/biomass fire.
• Locate the tank outdoors, far away from anything flammable (when in use).
• Heat the air inside the tank to about 300 degrees Celsius. You will need a temperature sensor inserted inside the tank (and sealed around with heat resistant sealant to prevent air from leaking out of the tank), to get a temperature reading. Careful monitoring is needed for this so that you don't exceed 300 degrees Celsius.
• After heating the air inside the tank is complete, cover the tank in insulating material all around, that is heat resistant, to reduce heat loss from the tank to the surroundings. The air inside the tank will be pressurized due to the heated inside air of it. The cooling down of the tank reduces this internal pressure, which reduces the amount of work energy that you can extract from it.
• As caution, consider putting the tank in a strong metal cage so that it doesn't cause injury if it explodes.
• This tank is inherently an energy storage device, which means you can use it whenever you need electricity, just like a battery. It can also serve as an energy storage device for electricity generated by solar panels, which could power an air pump to pump air into the tank initially, so that the initial gauge pressure inside the tank is greater than 0. This means more energy is available from the air inside the tank after heating it up. But make sure to account for this initial pressure in the design calculations for the tank.
• After the tank is heated it will immediately start losing heat to the environment (even if you cover it with thermal insulation which will only slow down the rate of heat loss). This means you have to immediately use the energy in the tank before it is lost, since once the tank cools down the air inside will reduce in pressure, and when the tank cools completely it will be at atmospheric pressure, and there will be no energy left. So only heat the tank when you need the electrical energy, or find a way to store the energy, perhaps with large batteries.
• You could also heat up the tank using solar energy. Solar focusing mirrors will help the tank get hotter. But burning wood or other biomass will heat up the tank faster and to a higher temperature, which results in more energy stored inside.
• The hot exit air from the tank can also be used for heating applications such as space heating, boiling water, and cooking. This improves the overall efficiency of the process.
• As the air is released from the tank it approximately expands adiabatically. I used this assumption in my energy and power calculations.
• You must exercise extreme caution since the air is released from the tank at a very hot temperature, about 200 degrees Celsius (based on the adiabatic assumption in my thermodynamic analysis). That said, the turbine which the pressurized air impinges upon, must be heat resistant.
• To make the overall system more efficient you can use the hot air exiting the turbine to preheat the air in a second tank. This is illustrated in Stage 3 in the above figure. The internal tube in this stage should have a length to internal-diameter ratio large enough to enable good heat transfer between the hot air inside the tube and the air inside the tank. A ratio of 200:1 is good. Note that the length used for this ratio is the length of the tube inside the tank.
• The tank will provide energy as long as the air inside the tank is above atmospheric pressure. Air will no longer exit the tank when the air pressure inside the tank reaches atmospheric pressure. This means that the turbine will no longer spin, and electricity will no longer be produced. However, there will still be heated air left inside the tank (which will be at atmospheric pressure). To use the tank again, under the same initial conditions, you want to replace this heated air with non-heated fresh air. You can do this by pumping in fresh air, while at the same time allowing the heated air to exit the tank. This can be done with two valves, one for the incoming air, and one for the exiting air. Since hot air is less dense than cold air it will rise above the cold air. To take advantage of this natural process, place the exit valve at the top of the tank, and the intake valve near the bottom of the tank. Once the hot air inside the tank is fully replaced with fresh air (at environmental temperature), then seal the valves. You will know that the hot air is fully replaced with fresh air when the temperature sensor reading indicates an internal air temperature equal to the environmental temperature.
• The tank is cylindrical shaped, with hemispherical ends. It is essentially a pressure vessel, and this shape helps it to withstand the pressure forces inside the tank when it is heated.
• The tank must be made of a steel type, thickness, and dimension that is strong enough to withstand the internal pressure once the tank is heated. A suitable factor of safety must be used in the calculations.
• The tank must be able to withstand the heat of the biomass fire without corroding. To help achieve this, you can paint the outside of the tank, and also the inside (if possible), with a high-heat resistant paint in order to help resist the high temperature of the fire.
Note that I have not covered all the potential design and safety concerns for this pressurized tank setup. So you have to carry out a careful analysis of this device in order to use it safely, or get someone else competent enough to do it. Now is a good time to read the disclaimer for this website.
That completes this article. So my answer to cheap energy for the average individual is: 1) Use solar panels to produce electricity, and 2) Heat air inside a tank and use the energy from the pressurized air to produce electricity (as described).
Return to Engineering page
Return to Real World Physics Problems home page
Free Newsletter
Subscribe to my free newsletter below. In it I explore physics ideas that seem like science fiction but could become reality in the distant future. I develop these ideas with the help of AI. I will send it out a few times a month.