How Heat Pumps Work
The purpose of this page is to cover the basic concepts explaining how heat pumps work, and give practical information for anyone who is considering installing a heat pump. This practical information includes installation cost and running cost analysis, and supplier listing. Heat pumps are a wonderful invention and are quite fascinating from a physics perspective. You see them in everyday applications, either in cooling applications, such as air conditioners, or heating applications, which will be explained on this page.To start off, let's first discuss the basics of how heat pumps work.
How Heat Pumps Work – The Basics
A heat pump is a device that “transports” heat energy from one place to another place. This is the basic feature of how heat pumps work. An air conditioner is a form of heat pump. It “extracts” heat from indoors and pumps it to the outside. So on the indoor side you have cool air blowing out of the vent, after passing through a heat exchanger. On the outdoor side you have warm air blowing out of another heat exchanger. The heat exchanger on the indoor side is called an evaporator and the heat exchanger on the outdoor side is called a condenser.
The next section goes into greater detail on how heat pumps work.
Principles Of Operation
The figure below illustrates a heat pump schematic.
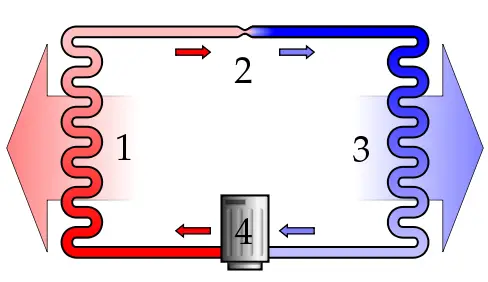
Source: http://en.wikipedia.org/wiki/Heat_pump. Author: http://commons.wikimedia.org/wiki/User:Ilmari_Karonen
Stage 1 is the hot side heat exchanger (for air conditioners this is on the outdoor side).
Stage 2 is the expansion valve.
Stage 3 is the cold side heat exchanger (for air conditioners this is on the indoor side).
Stage 4 is the compressor.
Reducing heat pumps into these four stages is the primary means by which to understand how heat pumps work.
Heat pumps utilize a working fluid called a refrigerant. This refrigerant is selected based on its useful physical properties during the different stages of operation inside a heat pump. The refrigerant is circulated through the heat pump using a compressor, which drives the process. The refrigerant enters the compressor, at stage 4, in a gaseous (saturated vapor) state at lower pressure and lower temperature and exits at higher pressure and higher temperature, in a superheated gaseous state. The refrigerant then passes through the hot side heat exchanger, and in so doing changes state into a liquid (stage 1). The associated heat loss of the gas and latent heat of condensation (due to phase change from gas to liquid) is transferred out of the heat exchanger and into whatever medium the heat exchanger is in contact with. For air conditioners this medium is the outdoor air. The refrigerant then passes through an expansion valve (stage 2), which forces the liquid refrigerant to flash into a gas and liquid mixture, at a pressure and temperature both lower than before entering the valve. This mixture then passes through the cold side heat exchanger in stage 3, during which the refrigerant completely converts into a gas. The associated latent heat of vaporization (due to phase change of the liquid portion of the mixture into a gas) is absorbed by the heat exchanger from whatever medium the heat exchanger is in contact with. For air conditioners this medium is the indoor air. From this stage the refrigerant then enters the compressor as a saturated vapor, and the cycle repeats.
As you can perhaps see, the useful refrigerant properties are mainly phase change properties, which occur spontaneously when the refrigerant is subjected to pressure and temperature changes both in the compressor and expansion valve. To fully understand this process one must perform a thermodynamic analysis. An excellent reference explaining the thermodynamic details of how heat pumps work is: The Oak Ridge Heat Pump Models: I. A Steady-State Computer Design Model for Air-to-Air Heat Pumps, Oak Ridge National Laboratory, S. K. Fischer, C. K. Rice, August 1983.
One interesting aspect of how heat pumps work is that you can actually transport more heat energy than the energy required to run them. For example, with an air conditioner you can transport more heat energy out of a building than the electrical energy required to power it. This makes it seem like there is an efficiency of over 100%. But how is this possible? How can you get something for nothing? Well, you actually don’t. As said before, a heat pump merely transports energy from one place to another. This is not the same thing as creating something out of nothing. So in the case of a heat pump it becomes more appropriate, for semantics if nothing else, to define a Coefficient Of Performance (COP), which is: (heat energy transported)/(energy input). So for an “efficiency” of 400%, COP = 4.
Alternatively, a heat pump can be used as a heater instead of a cooler/refrigerator. This is basically taking an air conditioner and flipping it around, so that the outside part is facing indoors and the inside part is facing outdoors. With this set up you will have a heater instead of an air conditioner. And once again, you can have an apparent efficiency greater than 100%.
But there is a catch.
In order to have a high COP, you have to be operating between certain temperature ranges. So if you are using a heat pump as a heater during the winter, you cannot have an outdoor temperature that is excessively cold, otherwise your COP will go down. In fact, the COP will approach 1 for outdoor temperatures that are -18 degrees Celsius or colder. This is because it becomes increasingly difficult to extract heat from the outdoors (to pump indoors) the colder it gets. Eventually, the heat energy transported becomes equal to the electrical energy input (COP = 1), and the cost of heating becomes much more expensive. So in this case a heat pump used for heating is best used during mild winter temperatures.
Similarly, if you use a heat pump as a cooler (air conditioner) during the summer, you cannot have an outdoor temperature that is excessively warm, otherwise your COP will go down. Fortunately, it never gets nearly hot enough during the summer to result in a COP approaching 1 – it would take an outdoor temperature of 50+ degrees Celsius!
This makes sense intuitively – a lower COP is the result of “pushing heat energy uphill” to a greater extent, and working against the natural direction of heat transfer – which is from hot to cold. So the greater the temperature difference you are working against, the more energy it takes and the less bang you get for your buck.
So we have a practical dilemma, especially where a heater is concerned: The more you need it, the less efficient it becomes, and the less you need it, the more efficient it becomes. But there is a way to deal with this, however. You can use the heat energy of the ground to keep the COP high. This is discussed in the next section.
Ground Source Heat Pump
This section is particularly useful to many people who want to know how heat pumps work, since they have geothermal/ground source units in mind.
The diagram below illustrates a ground source heat pump. This figure shows a heat pump and ground loop configuration.
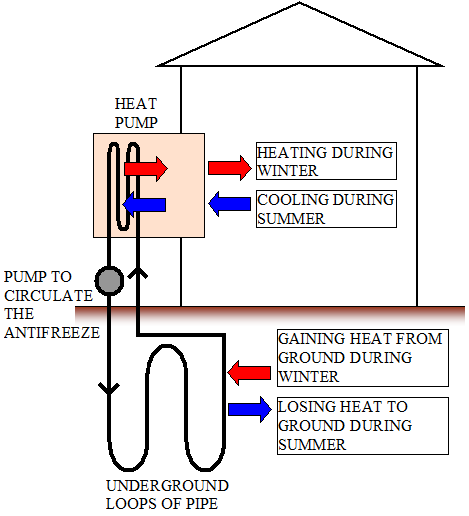
This figure shows a network of pipes running underground, to form a closed loop. If you go deep enough (e.g. 5-6 m in the Ottawa region) – well below the frost line, the ground stays at a roughly constant 10 degrees Celsius, all year, with little variation. This is due to the energy of the sun which warms the earth, and maintains a consistent temperature profile year round, at a certain depth. It is this steady temperature condition that allows a geothermal heat pump to operate efficiently.
During wintertime, an anti-freeze liquid solution, such as propylene glycol (mixed with water) – which serves as the heating medium, is pumped through the pipes and as it courses along it is heated up to roughly the (surrounding) ground temperature, which for the Ottawa area is 10 degrees Celsius. As the anti-freeze solution makes its way back up (in the heated state) it enters a heat exchanger which allows the heat energy (gained from the ground) to be transferred to the heat pump, which then transfers the energy indoors in order to heat the building. The anti-freeze solution, which is cooled at this point, makes its way back underground to gain heat once again from the ground, and the cycle repeats. The length of pipe running underground is proportional to the desired heating load.
During summertime the heat pump can be operated in reverse, as a cooler (air conditioner). So the operation is similar, except that instead of gaining heat from the ground, the anti-freeze solution (which now acts as the cooling medium) “loses” heat to the ground. As the anti-freeze solution makes its way back up (in the cooled state) it enters a heat exchanger which allows the heat energy of the inside of the building to be transferred to it, by way of the heat pump. This enables the building to get cooler inside. The anti-freeze solution, which is heated at this point, makes its way back underground to lose heat once again to the ground, and the cycle repeats. The length of pipe running underground is proportional to the desired cooling load.
What makes this method so attractive is that you have a free, readily abundant "heat sink" or "heat source" available from underground, which can be utilized for high efficiency heat pumps. During the winter you use the heat pump as a source of heating and during the summer you run the heat pump in reverse and use it as a source of cooling. Since, at a certain depth underground the temperature is relatively constant year round, the COP remains high year round.
The main benefit of this method is in heating, since that is where most of the savings are realized. It can be an improvement on other heating methods which may use natural gas, heating oil, or electric heating. By the way, electric heating is one of the least efficient ways to heat a building, since it has a COP of 1.
The main disadvantage of ground-source heat pumps is the initial up-front cost which can be around $2,500 (or more) per ton of capacity, in the U.S. and Canada. Note that one ton equals 12,000 BTU/hour, or 3.5 kW.
But because the annual operating cost can be significantly less than conventional heating systems, this system can pay for itself in a few years.
The figure below shows a picture of an underground pipe network typical of such an installation.
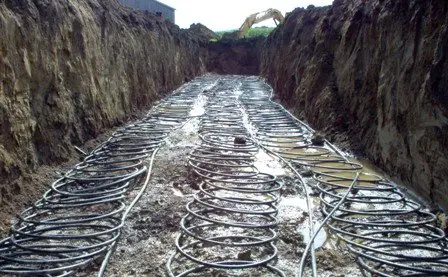
Source: http://en.wikipedia.org/wiki/Ground_source_heat_pump. Author: Marktj
The pipes can be placed vertically underground in a deep hole hundreds of feet deep or in large shallow trenches several meters deep. The deep hole may be the better option if you have a small property or you don’t want to dig up a large area, although this set up will cost more than a horizontal loop system. The length of pipe used is typically hundreds of feet. As a general rule, 500 – 600 feet of pipe in 250 – 300 foot trenches is required per ton of system capacity, depending on how damp the soil is (ref: http://www.earthheat.ca).
The pipes are typically made of plastic which requires longer length to reach ground temperature than metal pipes, but are lighter and more flexible and are very durable.
Quick Facts
Here are some quick facts about geothermal heat pumps:
• Total building energy cost reduction can amount to 60%
• The payback period can be 6-8 years
• Typical COP of a geothermal heat pump for heating and cooling is 3-4
In the next section we will perform a replacement cost analysis.
Replacement Cost Analysis
If you have a heating system that you are considering replacing with a geothermal heat pump system it is wise to first estimate your energy usage to see how much you will be saving, if at all. Have someone come to your home or business and do an assessment. But you can also try your hand at a rough calculation by looking at your energy bills. If you're using electricity for space and/or water heating then figure out how much electricity cost is tied to those particular uses, for one year. Call this amount X. So your annual savings would be equal to AS = X(1 − 1/COP).
If you're using a heating fuel instead, the calculation becomes more involved. You first have to calculate how much heating fuel you are using annually. Your energy bills should contain this information. Let's use natural gas in a sample calculation.
For natural gas, the unit of measurement is volume, in m3 (cubic meters). From your energy bills, add up the total volume (in m3) of natural gas used in one year, based on your meter reading. Call this volume V.
The energy density of natural gas is about 35,000 BTU/m3.
Now,
35,000 BTU = 10.26 kWh
To produce 10.26 kWh of heat energy, the amount of electrical energy input needed by the heat pump is 10.26/COP (e.g. for a COP = 3, the energy input is 10.26/3 = 3.4 kWh).
The associated electrical cost is then EC = (10.26/COP) × (cost per kWh of electricity in your area). Note that the electrical cost per kWh should be the total cost, which is: (total amount due on electricity bill)/(total kWh used based on your meter reading). In my area the electricity rate is 15 cents/kWh.
So, the annual electrical cost using a geothermal heat pump is EC×V.
Now from your energy bills, calculate the total cost of using natural gas for one year, taxes included. Call this NGC.
Therefore, your cost savings per year is AS = NGC − EC×V. This number may actually be negative in some cases, in which case you would be paying more for a geothermal heat pump system than with your current system.
We can now look at the payback period.
Given that maintenance costs are likely minimal, the approximate payback period in years = (cost of heat pump installation)/AS
The same basic calculation applies to other heating fuels, such as propane. Just keep track of the units used, and use the correct energy density per unit volume (an online search will give you that information). In some cases you may be using gallons instead of cubic meters.
Direct Exchange Geothermal Heat Pump
A variation on the geothermal heat pump is the Direct exchange geothermal heat pump. In this system the copper coil of the heat pump is placed directly in the ground and as a result exchanges heat directly with the ground. This allows for more efficient heat exchange with the soil because there is no intermediate heat exchange with a ground loop before heat exchange with the heat pump coil takes place. There is a more direct heat exchange path. This simpler design allows for a shorter length of tubing and reduced installation cost. However, the limitation of this design is that the compressor cannot be placed at a great distance from the ground coils. This can be restrictive depending on the application. As well, the cost of refrigerant can be high due to the high volume needed in the long copper coil.
Return to Engineering page
Return to Real World Physics Problems home page
Free Newsletter
Subscribe to my free newsletter below. In it I explore physics ideas that seem like science fiction but could become reality in the distant future. I develop these ideas with the help of AI. I will send it out a few times a month.